Unfortunately, camera has stopped
When you see the “Unfortunately, Camera has stopped” when you open your camera app, it stops you from taking any photos or shooting any videos.
Table of content
- What Causes the Unfortunately Camera Has Stopped Error in Android?
- How Do I Fix Unfortunately Camera Has Stopped?
- Restart the Camera App
- Switch Off/On the Android Device
- Clear Internal Storage & Format SD Card
- Clear Camera App storage (cache and data)
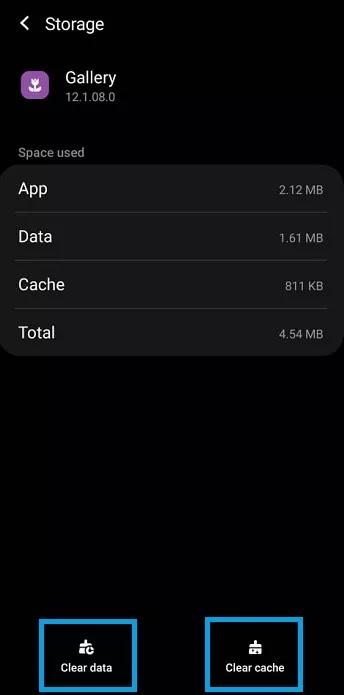
- Clear storage for the Gallery App
- Update Your Android Firmware
- Enable Safe Mode
- Hard/Factory Reset Android
- Check the position of camera flex
- Change the whole camera (Attachment)
Luckily, this should be an easy problem to fix. In this guide, you'll know what causes the error and go through several troubleshooting steps you can try to fix this problem.
What Causes the Unfortunately Camera Has Stopped Error in Android?
The camera on Android devices can malfunction due to various reasons. It can be the as a result of something simple like a software glitch or the result of complicated issue like a hardware malfunction.
Irrespective of the reason, you are expected to get the “Unfortunately, Camera has stopped” error message or other variations of it and it is due to the following reasons:
- Lack of internal storage
- Outdated Android system
- Malicious virus
- 3rd party app’s interference
- Hardware malfunction
If the error occurred due to software or other similar issues, then the following troubleshooting methods should be able able to fix it.
How Do I Fix Unfortunately Camera Has Stopped?
So, here are 10 effective solutions to fix the “Unfortunately, Camera Has Stopped” error on Android devices. Let’s try them out.
- Restart the Camera App
The “Unfortunately, Camera has stopped” error can appear when the camera app malfunction. So, restarting the Camera app may be the solution. Now, the camera app can malfunction or stop working if it’s been active for a long time. Also, if the app wasn’t launched properly same issue can happen.
So, you can simply close the Camera app, then wait for few minutes before you launch it again.
Alternatively, you can also force stop the app using the below steps:
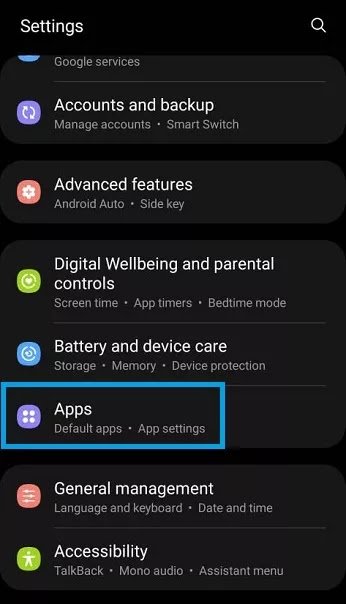
- Open the Settings app and tap on Apps / App management.
- Click on App settings
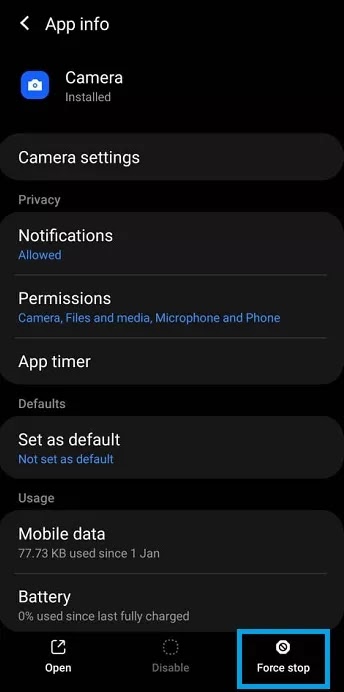
- Search and locate the Camera app. Then, click on it.
- Another screen will show where you'll see list of App info. Take a look beneath or at the top, you'll see the force stop button, then click on it to force stop the app.
- After you force stop the camera app, you need to wait for few minutes before launching the app again.
- Switch Off/On the Android Device
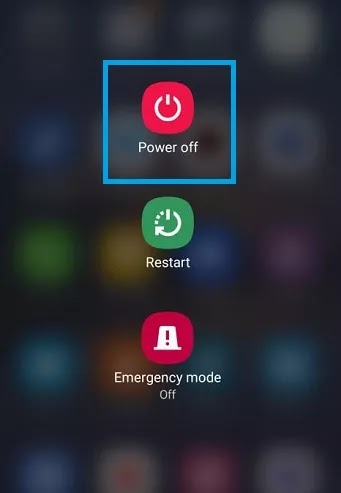
If you restart the camera and you are still getting the “Unfortunately, Camera Has Stopped” message, switch off the device by tapping on the Power Off option. Then, switch it On a few seconds later and hope for good result.
Alternatively, you can also restart the device by tapping on the Restart button from instead of the power off option from the Power Menu.
Alternatively, you can also restart the device by tapping on the Restart button from instead of the power off option from the Power Menu.
- Clear Internal Storage & Format SD Card
One of the biggest reasons for the “Unfortunately, Camera Has Stopped” error is the low internal storage. If there little or no free space available in the internal storage of your Android device, the camera itself will not be able to function properly.
So, freeing up some space by deleting unwanted files and photos should do the trick. You can even go further and remove the irrelevant applications that you haven’t been using for a long time.
Alternatively, if you are unable to delete any files, moving them to cloud storage is recommended. Google Drive should be the most recommended cloud storage option for you, which comes with 15GB of free storage space.
So, after moving few files to the cloud storage, the error should fix on its own. However, if you have an SD Card in your device, this could be a technical issue, instead of a storage issue.
If any files on the SD Card are corrupted, then the presence of those files could have caused this error. In that case, you have to format the SD Card to fix the issue. Ensure to back up the important files before formatting the SD card.
- Clear Camera App storage (cache and data)
All Android apps create cache files, including the camera app. Over time, these files pile up and consume a lot of space. So, it is better to recycle them from time to time.
If too many cache files have piled up, then the risk of corrupting the cache files is high. In the presence of these corrupted cache files, the camera would not function well.
To do this, follow the below steps:
- Launch the Settings app on your device and tap on Apps / App management
- Click on App settings
- Search and locate the Camera app. Then, click on it.
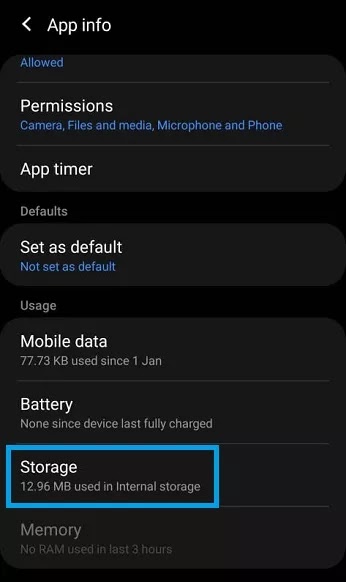
- Another screen will show where you'll see list of App info. From the list of info, you'll see Storage, click on it to open the storage panel.
- Once the panel is opened, tap on the Clear Cache option at the bottom.
- While you are at it, clear the app data as well, just to be safe.
Clearing app data won’t cause any issue. However, if you had custom settings for the camera app, then after clearing the app data, those custom settings won’t be available.
So, click on the Clear Data option at the bottom of the panel, just beside / above the Clear Cache option.
- Clear storage for the Gallery App
Just like the camera app, we also need to clear the cache and app data for the Gallery app.
Now, you have a question, why the Gallery app?
Well, all pictures and videos taken by the camera app are stored in the gallery app. If an issue occurs with the gallery app, then it may also affect the performance of the camera app.
So, follow the steps discussed in the above solution. Find the Gallery app, under Apps/App management, navigate to the Gallery app’s Storage Panel and tap on the Clear Data and Clear Cache button.
- Update Your Android Firmware
It is necessary to keep your Android OS up-to-date, otherwise, different issues will occur, which includes the “Unfortunately, Camera Has Stopped” error.
So, if you your Android OS is not updated, This is the time to do so:
- Go to the Settings app on your Android device .
- Scroll down and tap on the systems.
- On the following page, tap on system update.
- Enable Safe Mode
Using 3rd party apps is on the rise, especially if you are a photo fanatic type who loves to use various filter and editing apps on your mobile.
If the problem persists, you should look into these apps. These apps may be interrupting the camera app, making it unusable.
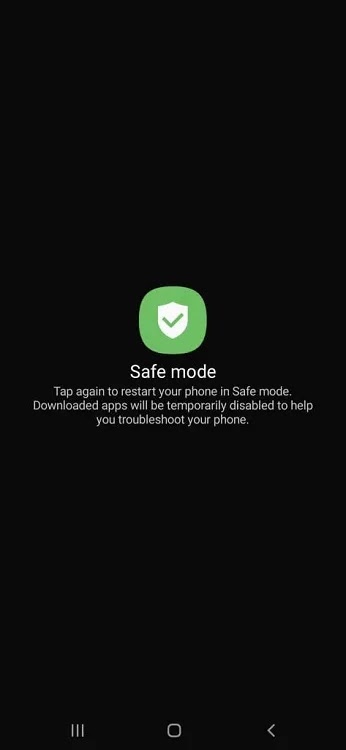
Now, to confirm this, you need to boot your Android device in Safe Mode. In safe mode, your apps are disabled. So, you will be able to get a clear view of the issue.
- Tap and hold the Power button of your Android device.
- Tap and hold the Power Off option, to Enter Safe Mode
- The Safe Mode option will then appear on the screen, click on it to enter Android Safe Mode.
- Now, open the camera app in safe mode.
- Hard/Factory Reset Android
Lastly on the software troubleshooting guide, There's no other option but to reset your Android device to factory settings.
Factory or Hard resetting the device will likely fix the issue as it is one of the most effective troubleshooting methods. Unless you cause is hardware.
However, factory reset will erase all the data from your Android mobile. So, it is recommended to back up your Android phone before initiating the factory reset process.
To do this,
- Launch the Settings app on your Android device and tap on System/General Management.
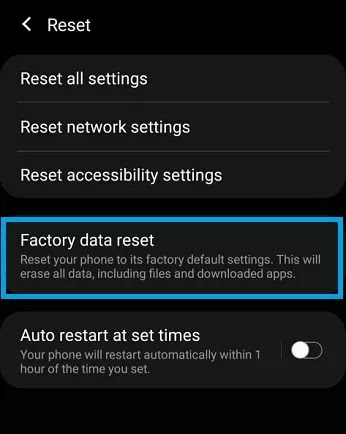
- Navigate to Reset and then tap on the Erase all data (factory reset).
- Tap on Factory Data Reset in Reset Menu.
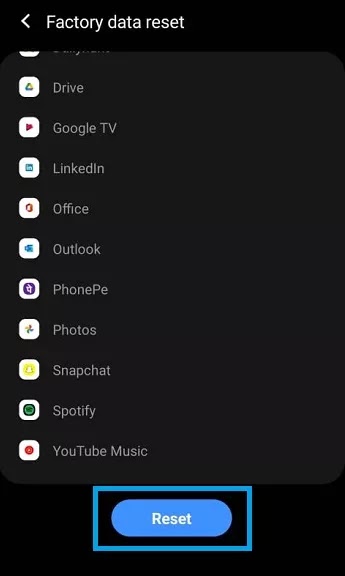
- Then, scroll down and tap on the Blue Reset button on the next panel.
- Factory Reset Android
- Tap on the Erase all data button to Reset Android.
If none of the solutions above worked for you, a hardware issue might be the next troubleshooting solution.
In that case, you’ll need to either contact your phone manufacturer for support or follow the last 2 steps.
- Check the position of camera flex.
The error can occur of you are the careless type that your phone fell frequently. If that is the case, then you can try this method. Here, you have to dismantle the device and locate the camera flex, check if it's fixed in it's position well or of there's any misplacement.
If either of the two conditions is present, then repositioning the camera correctly could fix the issue.
- Change the whole camera (Attachment)
Sometimes the problem lies in the camera itself. Apart from the phone hitting the ground, the camera itself might have got spoilt due to some factors like: water damage, bad camera lens, e.t.c. Changing the whole component (camera) should get should correct the error message.
RELATED: app not installed: The ultimate fix Android device
We hope one of the above methods has helped you to fix the “Unfortunately, camera has stopped” error in your Android devices.Incase you know of any other methods to troubleshoot or fix the “Unfortunately Camera has stopped” error on Android device, kindly let us know via the comment section below.


